Two months later and I’m back with another wonky perspective post. This time instead of faking depth, I’m going to remove it. Specifically, I tried my hand at making an anamorphic image of something from 1984 (because I didn’t want a meaningless picture and we read 1984 last year).

According to Wikipedia, anamorphic images are images that must be viewed from a specific position or using a special device in order to see a recognizable image. In my case, I divided an image I found on google into several parts and then resized them.
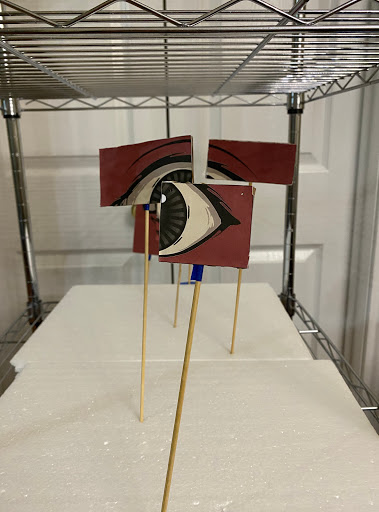
Here it is.

There are some … big differences.
Logically, it’s not too difficult. As long as the proportions on each part of the same, then the dilation factor doesn’t matter. The difficult part comes from arranging the pieces together in real life. For some anamorphic images, computer programs are used to make a plan for how to arrange the parts, but I didn’t use a computer to make the image aside from cropping and resizing pictures since
1. I don’t know how
and
2. I’m not sure it would’ve helped enough to be worth the extra time.
So at this point, I might as well start talking about what I did and where it all went wrong.
Process
After finding the image I wanted to use, I split it into 11 parts (or a-score-minus-nine parts) and then cropped and resized each part.

This stage is actually where I first messed up because I didn’t measure how much I scaled each image. Generally the rule of thumb is that distance is proportional to size, so if you double the size of something, you should move it twice as far away to make it appear the same size. Here though, I just rounded the length dimension to the nearest 0.5 on PowerPoint so I didn’t know the dilation factor and had to guess all the distances.
The next step was printing all the pieces and then taping them to a more solid surface. I chose to use cardboard since paper is a little too flimsy to ensure a nice picture. Though to be fair, the cardboard wasn’t exactly the easiest to work with either …

Finally came the setting up step. Here’s the tricky part. Since the pieces have to be different distances from each other, most of the easy solutions require suspension of some kind.
At first, I tried hanging all the pieces using red thread tied to some chopsticks, but I quickly ran into some problems.
1. The pieces tend to spin. Maybe this was due to how thin the string I used was, but even the slightest vibrations would send the pieces twirling.
2. The pieces will not be balanced evenly. Same as problem 1, the slightest shift or tug of the string would tilt the piece and ruin the image. Adjusting each piece would just send it careening again, forming an endless loop.
3. Adjustment of height is very difficult. Tying notes for every piece makes it troublesome to move the pieces. This is worst when after you notice a mistake in relative distances since moving a piece closer or farther away from the camera requires a change in height. Also, the process of tying the knot can sometimes move the piece higher or lower than it should be, which truly makes this a trial of patience.
Unable to successfully troubleshoot the problems that took up more time than I had, I ultimately decided to give up.

Viewing the result, I think my discouragement is justified. It took my nearly 2 hours to hang 3 pieces and in the end, they didn’t even match properly.
As I approached Hour 4 of the assembly process, I decided to switch to sticking every piece on a stick and then stabbing the sticks into Styrofoam. Theoretically this method is easier though not as aesthetically pleasing as the Styrofoam and sticks ensured the pieces wouldn’t shift or twirl and made adjustments easy. However in practice, the method came with its own litany of frustrations.
The problem with stabbing sticks into Styrofoam is that after enough stabs, the Styrofoam starts to have pits that make small adjustments almost impossible. On top of this, grooves in the cardboard meant the sticks didn’t stab perpendicularly through the pieces so I had to factor the tilt of the pieces on the sticks and the tilt of the sticks in the Styrofoam when piecing together the image. And remember before how I mentioned working with cardboard isn’t a complete walk in the park? Yea … Somewhere during the cutting process, I must have chopped just enough off the cardboard so that there wasn’t a noticeable difference until I tried to piece all the parts together. The mistakes warped the pieces leading to gaps and overlaps in the final image.
What’s more, my rounding of the dimensions instead of careful calculations resulted in the image being larger than I expected. The biggest piece needed to be farther back than I could stably put it and had to be lower than the Styrofoam base I used. In the end, I chose to just do the top half of the image with the eye.

Of course there are some (read: a lot) of errors, like the gaps between pieces, but if you squint and look from the side, it does look like one single eye. Hopefully? However despite how wonky the final image looks, it looks more like a poorly put-together puzzle than an amalgamation of different pieces at different distances from the camera thus I have (somewhat) successfully accomplished the goal of this project: removing depth from an image.
Bonus
Here’s what the eye looks like from a different vantage point that’s straight in front of the model instead of angled slightly to the bottom left.
Here’s another image of what the model looks like from the side. You can see the distance between all the pieces and the result of foolishly random dilations. Also please note how tilted each stick is (except for that second left-most one? I don’t know how that happened), a result of too much Styrofoam stabbing and attempts at making the final image look more cohesive.

