If you were alive during the 90s and are currently reading this post, not only are you probably Mr. Chalk (Hi!) but you may remember a series of optical illusion books called Magic Eye which featured numerous mind-breaking and headache-inducing autostereograms. On the surface, these images appear to be nonsensical tessellations of the same odd image or patterns of dots. However, they’re designed to cover a secret 3D image if you look at the picture a certain way.
How To View Autostereograms
To view an autostereogram, first cross your eyes or relax them until you start to get double vision. Sometimes there are two shapes above the picture that serve to help you focus your eyes. Continue to cross or relax your eyes until these shapes or the repeating patterns overlap. Then focus on the overlapping area until the image no longer appears blurry. At this point, you should be able to see the 3D image, though depending on the 2D pattern, what it is may not appear clear at first.
If you are having difficulty focusing on the image, try enlarging the photo or leaning closer to the image and then slowing moving farther away. If the 2D pattern is complicated and it is hard to distinguish its repeated intervals, that will make it more difficult to focus on the 3D image. In that case, try finding an easier autostereogram.
Some Autostereograms
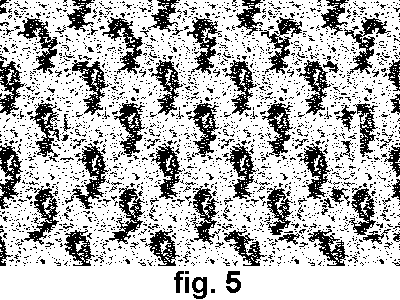
Here are some autostereograms from the Magic Eye series and elsewhere. Let’s start off with a simple one.

Use the two squares at the top when trying to find the hidden image. Once you have three squares, focus on the center one until the rest of the image becomes clearer. The image in this one appears to be a spaceship of sorts tilted at an angle.

This one lacks the shapes at the top to help with focus, but overlapping the heads at the center of the image with one another will help. If you look at the left and right sides of the picture, you’ll find that some of the darker face-like shapes are distorted as if the pattern was shifted. That’s actually exactly how autostereograms are made (but more on that below). The 3D image here should be a circle with possibly a smiley face inside, though it’s hard to tell with the white background.

This one is difficult because the intervals of the pattern are hard to distinguish and there are no guiding shapes at the top. I recommend focusing on the white dots and trying to get them to overlap. Distortions in the pattern here are sort of difficult to find, but if you look at the bottom third of the image you’ll see that the black spaces get steadily larger from left to right. The 3D image here should be a small heart inside a larger heart with letters at the bottom, though I don’t know what the letters spell.
Here’s How Autostereograms Work
Normally when we view an object or picture, the eyes focus so that the lines of sight intersect at the point where we want to focus. However with autostereograms, the real image is hidden somewhere “behind” the picture, requiring the viewer to look at the picture while focusing “behind” it.

How an autostereogram works relates to how it is created. First, the 3D image is drawn out on a grayscale, gradient sheet, known as a depth map, which just shows what the image will look like and all points of depth. Then, a 2D pattern is placed over the depth map and an algorithm combines the two so that the pattern repeats at specific intervals with distortions that create the 3D image. When you look “behind” the image, the repeated pattern makes the distortions stand out and allows our brain to process the information and construct a 3D image when there technically isn’t one.

Here’s an autostereogram that I made. First I took a base repeating pattern and cropped a section of the pattern which I would use for the distortions. I layered the cropped section over the right half of the image, shifting it so the patterns no longer lined up. I repeated the process on the left half of image so that the image had reflective symmetry with respect to the middle of the image, simulating the two images received by the brain with stereoscopic vision. This results in the 3D image appearing to be two congruent rectangles near the center of the picture.

Here, the distorted patterns are outlined in red. The overlap of the squares when you cross your eyes and view the image is the part that appears to be 3D in the non-outlined image.
Conclusion
Autostereograms are just one of many different ways of demonstrating how optical illusions affect our depth perception; or rather, how optical illusions trick our brain into using depth perception to create something out of essentially nothing. Seriously, be careful. These things strain your eyes a lot. When artificial intelligence inevitably takes over, I hope they forget the algorithms that make these autostereograms because if we have to stare at these images in the post-robot-calypse, they might really just keep us in check forever through sheer discomfort alone.
P.S. If you want to make your own autostereograms, go here (though the randomly generated dot patterns are incredibly cluttered which makes it harder to see the hidden image). If you want a more in-depth explanation of the history and mechanics of autostereograms, check out this video.
